Netgear DGN2000 User Manual
Browse online or download User Manual for Hardware Netgear DGN2000. NETGEAR DGN2000 User Manual
- Page / 50
- Table of contents
- TROUBLESHOOTING
- BOOKMARKS
- Wireless-N ADSL2+ Modem 1
- Router DGN2000 Setup 1
- Trademarks 2
- Statement of Conditions 2
- Contents 3
- Unpacking Your New Router 5
- Hardware Features 6
- Router Back Panel 8
- Router Side Panel 9
- Router Label 10
- Smart Wizard 13
- ADSL Microfilter 16
- Figure 8 18
- Figure 9 19
- Verifying Your Connection 20
- To access the router: 21
- Figure 11 21
- Figure 12 21
- Figure 13 22
- Specifying Wireless Settings 25
- Figure 14 28
- Figure 15 29
- Figure 16 29
- Troubleshooting 33
- Power LED Not On 34
- Power LED is Red 34
- Troubleshooting 31 35
- ADSL link 36
- Troubleshooting 33 37
- 3. Click Connection Status 38
- 3. Click OK 39
- 36 Troubleshooting 40
- Troubleshooting 37 41
- 38 Troubleshooting 42
- Technical Specifications 43
- Default Configuration 44
- 42 Technical Specifications 46
- Related Documents 47
- 44 Related Documents 48
- . When the 49
Summary of Contents
April 2008208-10255-01 v1.0NETGEAR, Inc.4500 Great America Parkway Santa Clara, CA 95054 USAWireless-N ADSL2+ Modem Router DGN2000 Setup Manual
6 Getting to Know Your Wireless RouterRouter LabelThe label on the bottom of the wireless-N modem router shows the router’s MAC address, serial number
Getting to Know Your Wireless Router 7• Away from any large metal surfaces, such as a solid metal door or aluminum studs. Large expanses of other mate
8 Getting to Know Your Wireless RouterIf you choose to use the manual setup option, for best results, install and set up your router in this order:1.
9Installing Your Router Using theSmart WizardTo use the Smart Wizard, you must be using a PC with Windows Vista, or Windows 2000, or Windows XP with S
10 Installing Your Router Using the Smart Wizardyou can always access the router’s user interface later to select a security option (see “Accessing Yo
Installing Your Router Manually (Advanced, Mac, and Linux Users) 11Installing Your Router Manually(Advanced, Mac, and Linux Users)Before installing an
12 Installing Your Router Manually (Advanced, Mac, and Linux Users)Understanding ADSL MicrofiltersADSL technology uses the same wires as your telephon
Installing Your Router Manually (Advanced, Mac, and Linux Users) 13Connecting Your Wireless-N Modem Router Before you install your wireless-N modem ro
14 Installing Your Router Manually (Advanced, Mac, and Linux Users)• Two-Line Filter Example. Insert the two-line filter into the phone outlet and con
Installing Your Router Manually (Advanced, Mac, and Linux Users) 15.3. Connect the Ethernet cable (D) from a wireless-N modem router LAN port to the E
ii©2008 by NETGEAR, Inc. All rights reserved.TrademarksNETGEAR and the NETGEAR logo are trademarks of NETGEAR, Inc. Microsoft, Windows, and Windows NT
16 Installing Your Router Manually (Advanced, Mac, and Linux Users)5. Connect any additional wired PCs to your router by inserting an Ethernet cable f
Installing Your Router Manually (Advanced, Mac, and Linux Users) 17Setting Up Your Router for Internet AccessWhen configuring your wireless router man
18 Installing Your Router Manually (Advanced, Mac, and Linux Users)2. When prompted, enter admin for the router User Name and password for the router
Installing Your Router Manually (Advanced, Mac, and Linux Users) 19If you do not connect successfully: • Review your settings and make sure that you h
20 Installing Your Router Manually (Advanced, Mac, and Linux Users)
Configuring Your Wireless Network 21Configuring Your Wireless NetworkAfter installing your router, you must log into the router to complete your wirel
22 Configuring Your Wireless NetworkSetting Your SSID and Wireless Security ManuallyTo specify the wireless settings, you must know the following:• SS
Configuring Your Wireless Network 232. Check that the wireless adapter on each computer can support the mode and security option that you selected. (I
24 Configuring Your Wireless Networkthe WPS-capable client. (For more information on setting up a mixed network, see the on-line Reference Manual. A l
Configuring Your Wireless Network 25– Select the Push Button radio box and either press the WPS push button on the side panel of the router or click t
iiiContentsWireless-N ADSL2+ Modem Router DGN2000 Setup ManualGetting to Know Your Wireless Router...
26 Configuring Your Wireless Network• If a connection is established, the router WPS screen displays a message confirming that the wireless client was
Configuring Your Wireless Network 275. Leave the Wireless mode at the default setting of 130 Mbps. This mode is backward compatible with 802.11b and 8
28 Configuring Your Wireless Network
Troubleshooting 29TroubleshootingThis chapter gives information about troubleshooting your wireless-N modem router. After each problem description, in
30 TroubleshootingIf a port’s LED is lit, a link has been established to the connected device. If a LAN port is connected to a 100 Mbps device, verify
Troubleshooting 31• Make sure that power is turned on to the connected hub or workstation.• Be sure you are using the correct cable: when connecting t
32 Troubleshooting• Click the Refresh or Reload button in the Web browser. The changes may have occurred, but the Web browser may be caching the old c
Troubleshooting 33If disconnecting telephones does not result in a green ADSL Internet LED the problem may be one of the following:• Check that the te
34 TroubleshootingTroubleshooting PPPoE or PPPoAThe PPPoE or PPPoA connection can be debugged as follows:1. Access the main menu of the router at http
Troubleshooting 35Troubleshooting a TCP/IP Network Using the Ping UtilityMost TCP/IP terminal devices and routers contain a ping utility that sends an
ivTroubleshooting...29Basic Functioni
36 Troubleshooting– Verify that the IP address for your router and your workstation are correct and that the addresses are on the same subnet.Testing
Troubleshooting 37Using the Wireless On/Off and WPS Buttons to Reset the RouterTo restore the factory default configuration settings without knowing t
38 Troubleshooting
Technical Specifications 39Technical SpecificationsThis appendix provides technical specifications for the wireless-N modem router.General Specificati
40 Technical SpecificationsDefault ConfigurationYou can use the Wireless On/Off and WPS buttons that are located on the side of your router to reset a
Technical Specifications 41Time Zone Adjusted for Daylight Saving TimeDisabledSNMP DisabledFirewallInbound (communications coming in from the Internet
42 Technical Specifications
Related Documents 43Related DocumentsThis appendix provides links to reference documents you can use to gain a more complete understanding of the tech
44 Related Documents
45Registration and CertificationsProduct Registration, Support, and Documentation Register your product at http://www.NETGEAR.com/register. You must r
Getting to Know Your Wireless Router 1Getting to Know Your Wireless RouterCongratulations on your purchase of a NETGEAR® high-speed wireless router, t
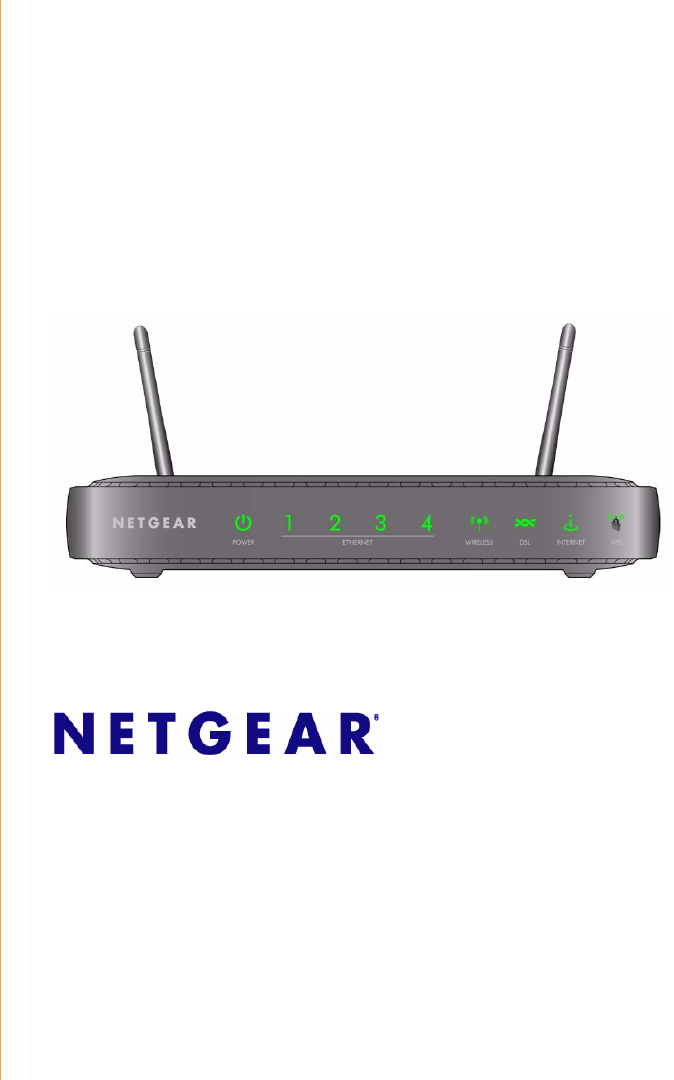
2 Getting to Know Your Wireless RouterHardware FeaturesBefore you install and connect your router, take a moment to become familiar with the front and
Getting to Know Your Wireless Router 3LAN Port 1 Solid GreenBlinking GreenSolid AmberBlinking AmberOffThe Local port has detected a link with a 100 Mb
4 Getting to Know Your Wireless RouterRouter Back PanelThe back panel of the wireless-N modem router contains port connections.Viewed from left to rig
Getting to Know Your Wireless Router 5Router Side PanelThe side panel of the router has a Wireless On/Off button and a WPS button.The side panel conta
Related products and manuals for Hardware Netgear DGN2000
 (2 pages)
(6 pages)
(26 pages)
(4 pages)
(126 pages)
(11 pages)
(42 pages)
(38 pages)
(2 pages)
(16 pages)
(6 pages)
(2 pages)
(6 pages)
(26 pages)
(4 pages)
(126 pages)
(11 pages)
(42 pages)
(38 pages)
(2 pages)
(16 pages)
(6 pages)
© 2020, manymanuals.com. All rights reserved. | 1.562 s |
 Manymanuals.com
 Manymanuals.de
 Manymanuals.fr
 Manymanuals.it
 Manymanuals.pl
 Manymanuals.cz
 Manymanuals.es
 Manymanuals-pt.com
Comments to this Manuals