)NSTALLATION'UIDE
WNDAP330 ProSafe 802.11n Dual Band Wireless Access Point
Start Here
Follow these instructions to set up your wireless access point. Before proceeding with the
WNDAP330 installation, familiarize yourself with the contents of the Resource CD.
Please refer to the Reference Manual on your Resource CD for instructions on advanced
configuration options.
Estimated Completion Time: 30 minutes.
Tip: Before mounting the WNDAP330 in a high location, first set up and test the
WNDAP330 to verify wireless network connectivity.
First, Verify the Package Contents
Unpack the box and verify the contents:
• WNDAP330 ProSafe 802.11n Dual Band Wireless Access Point
• Straight through Category 5 Ethernet cable
• Power adapter and cord (12V, 1.5A)
• Three dual-band antennas: 2 dipole (long); 1 patch (square)
• Installation Guide
• Resource CD which includes a link to the Reference Manual
• Warranty/Support Information Card
Then, Set Up the WNDAP330
1. Connect the wireless access point to your computer.
a. Prepare a PC with an Ethernet adapter. If this PC is already part of your network,
record its TCP/IP configuration settings. Configure the PC with a static IP
address of 192.168.0.210 and 255.255.255.0 as the subnet mask.
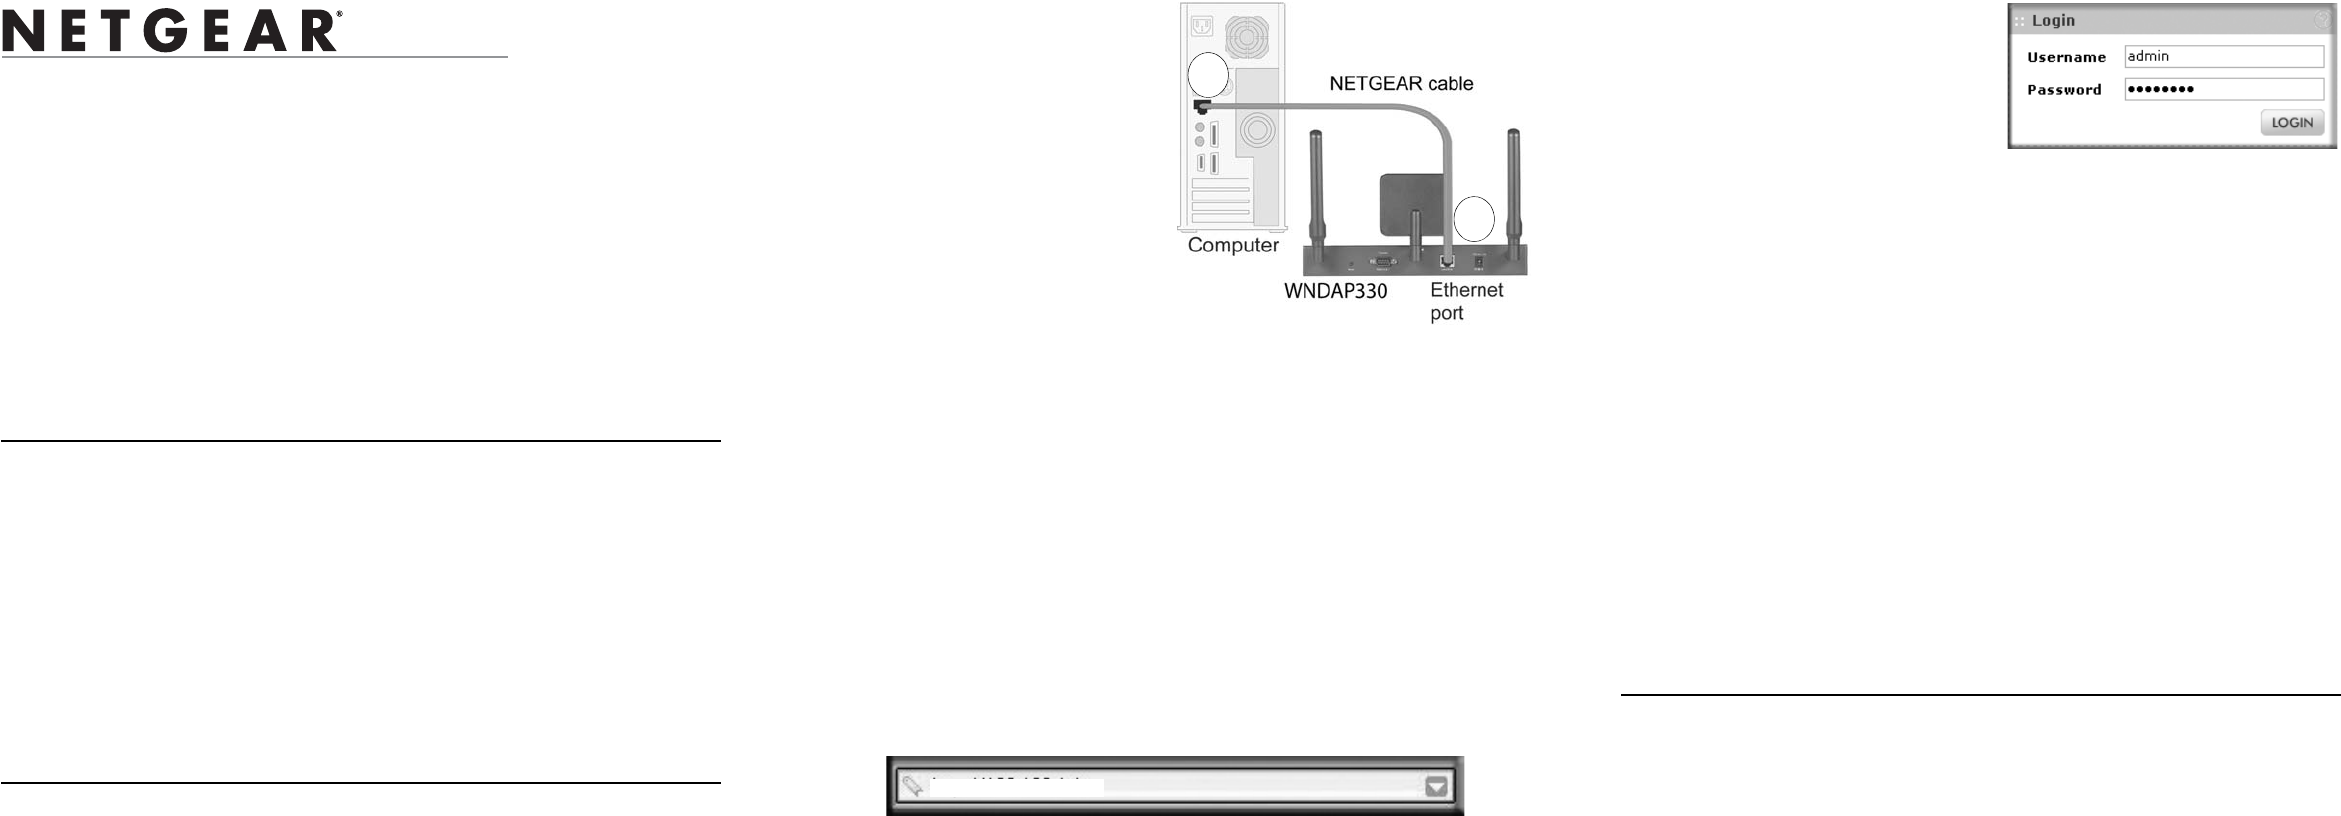
b. Attach the three antennas to your
wireless access point. The
antennas are interchangeable and
can be attached in any
configuration.
c. Connect an Ethernet cable from
the WNDAP330 to the PC (point
A in the illustration).
d. Securely insert the other end of the
cable into the WNDAP330
Ethernet port (point B in the
illustration).
e. Connect the power adapter to the
WNDAP330 and verify the
following:
• Power. The power light should be lit. If the power light is not lit, check the
connections and check to see if the power outlet is controlled by a wall
switch that is turned off.
• Test. The test light blinks when the WNDAP330 is first turned on.
• LAN. The LAN light on the WNDAP330 should be lit (no light for a 10
Mbps connection, amber for a 100 Mbps connection, and green for a 1000
Mbps connection). If not, make sure the Ethernet cable is securely attached
at both ends.
• Wireless. The 802.11ng WLAN light should be lit.
2. Configure LAN and Wireless Access
a. From your PC, configure the WNDAP330 Ethernet port for LAN access.
Connect to the WNDAP330 by opening your browser and entering
http://192.168.0.235 in the address field.
A login window will display.
A
B
http://192.168.0.235
b. When prompted, enter admin for the
user name and password for the
password, both in lower case letters.
The WNDAP330 user interface will
display
c. Select Configuration > System >
Basic > General from the menu and
configure the Access Point Name and select the appropriate Country/Region of
operation from the pull-down menu.
d. Select Configuration > IP > Basic from the menu and configure the IP settings
for your network.
e. Select Configuration > Wireless > Basic > Wireless Settings from the menu and
configure the wireless interface for wireless access.
f. Then, select Configuration > Security > Basic from the menu and and click Edit
to configure the level of data encryption security for your network.
See the online help or the Reference Manual for full instructions. (A link to the
online Reference Manual is on your Resource CD.)
3. Test Wireless Connectivity
Using a PC with a wireless adapter configured according to the wireless settings you
just set in the WNDAP330, establish a wireless connection to the WNDAP330.
Now that you have finished the setup steps, you are ready to deploy the WNDAP330
in your network. If needed, you can now reconfigure the PC you used in step 1 back
to its original TCP/IP settings.
Now, Deploy the WNDAP330
1. Disconnect the WNDAP330 and position it where you will deploy it. The best
location is elevated, such as wall mounted or on the top of a cubicle, at the center of
your wireless coverage area, and within line of sight of all the mobile devices.
2. Position the antenna. Vertical positioning provides best side-to-side coverage.
Horizontal positioning provides best top-to-bottom coverage.
3. Connect an Ethernet cable from your WNDAP330 Access Point to a LAN port on
your router, switch, or hub.
4. Connect the power adapter to the wireless access point and plug the power adapter in
to a power outlet. The PWR, LAN, and Wireless LAN lights should light up.


 (142 pages)
 Manymanuals.com
 Manymanuals.de
 Manymanuals.fr
 Manymanuals.it
 Manymanuals.pl
 Manymanuals.cz
 Manymanuals.es
 Manymanuals-pt.com
Comments to this Manuals